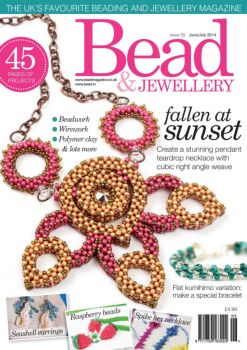
THE UK’S FAVOURITE BEADING AND JEWELLERY MAGAZINE45 BeadIssue55 June/July2014PAGES OF www.beadmagazine.co.ukPROJECTS &JEWELLERYwww.bead.tv ● Beadwork sfaullnensaett ● Wirework ● Polymer clay Create a stunning pendant teardrop necklace with & lots more cubic right angle weave Flat kumihimo variation: make a special bracelet Raspberry beads Spike key necklace £4£.949.99Seashell earrings RASPBERRY BEADS
2 beadmagazine.co.uk JUNE/JULY 2014 • ISSUE 55
NSHoIFwPLPeAIi$NTg1EhG5tRT0lA0OimTUEitK One Fire Mountain Way, DEPT C022 Grants Pass, OR 97526-2373 541-956-7890 America’s Favorite Beading and Jewelry Supply Company® You supply the creativity, we supply everything else!®Go online to see 120,000 hotjewelry-making products Kirstin Eismin, OH www.funkyartsy.com Finalist, Pearl Jewelry-Making ContestJUNE/JULY 2014 • ISSUE 55 Fire Mountain Gems and Beads© 2014 beadmagazine.co.uk 3
11 12 44 36 30 66what’s inside... 818 Bead Stash 71 Book Shelf 4218 Shopping 83 Designer's ProfileSummer travels means beading Learning and Expanding - Nicoleand designing on the go Stanley26 Designer's Profile 86 Noticeboard - GroupsTeachable Moments - Marcia Listings for bead groupsDeCoster 87 Bead Groups48 Designer's Profile We meet The BeadettesObsession with Clay - AnikoKolesnikova 89 Suppliers 89 Competition!61 Reader Challenge 90 Award-winning AdviceThe theme was 'Under the Sea' Get expert competition submission advice from a few past winners69 Shop ProfileWe meet Raggle Taggle Beads4 beadmagazine.co.uk JUNE/JULY 2014 • ISSUE 55
78 56 6272 20 52projects11 Desert Flora 42 Flat umihimo ariation 66 Firework FlowersLet a polymer clay pedant be a fun Put your kumihimo skills to the test Bright polymer clay creates oral focal in this quick necklace with this advanced braided variation explosions of coloured owers12 Fallen at Sunset 44 Peacock Butter y eadband 72 ictorianaUse cubic right angle weave to Be inspired by the bright colours of Different sizes of beads give thismake a stunning statement piece the eacock Butter y for this piece bracelet a nice subtle texture20 ibiscus aircomb 52 Bhangra Bangle 76 Pronged Cabochon PendantVenetian beadwork techniques Crystals make this fabulous Set a cabochon of any size intomake this hairpiece outstanding wirework bracelet sparkle twisted wire for a custom pendant30 Crystal earts 56 Peanut Bead Raspberry ecklace 78 rist ConfettiBling out some simple polymer clay Bead a bunch of raspberries for this Crystal buttons ramp up the sparklehearts for a fun and easy gift herringbone-chain fruity necklace on this colourful ribbon bracelet36 Spiked ey 62 Seashell arrings 81 Tropical FishStay on trend with this skeleton key The sea has inspired these fun Hollow metal clay fish are fun to addspiked out with crystals and beads earrings complete with seaweed for a tropical charm bracelet 76JUNE/JULY 2014 • ISSUE 55 beadmagazine.co.uk 5
Bead meet the team &JEWELLERY Jennifer Airs Julie Ashford Katie Dean beadmagazine.co.uk JUNE/JULY 2014: Jennifer is addicted Julie is a designer, Katie loves colours, ISSUE 55 to beads and is all round slave to shapes, and the Bead is published 8 times a happiest when things beading, and freedom beads year by Ashdown.co.uk, Unit planninvvwvg a new owner of Spellbound give her. She is the 5E, Park Farm, Chichester piece of beadwork. Bead Co. author of numerous bead books. Road, Arundel www.jdjewellery.co.uk www.spellboundbead.co.uk www.beadflowers.co.uk West Sussex, England BN18 0AG Christi Friesen Dawn Sue Heaser Tel: +44 (0) 1903 884988 Gatehouse www.ashdown.co.uk Christi is an award- Sue is an [email protected] winning artist, Dawn is an award- international author EDITOR: Allison Roe specialising in winning jewellery specialising in both [email protected] polymer clay and designer working metal clay and DESIGN: Allison Roe, Wendy mixed media designs. mostly with wire and beads. polymer clay. Crosthwaite www.christifriesen.com www.pollyred.co.uk www.sueheaser.com PHOTOGRAPHY ASSISTANT: Richard Jennings Anna Lindell Helene Donna UK ADVERTISEMENT Llewellyn McKean-Smith SALES Anna runs Tierguld, Maria Fitzgerald +44 (0) 1903 her bead business, Helene is a polymer Donna is owner of 884988 from Sweden. She clay and mixed Riverside Beads, Media Account Manager often lets the beads media artist who and she has a great [email protected] decide what they want to become. also specialises in lampwork. passion for designing new pieces. US ADVERTISEMENT www.tigerguld.com www.kharazjewellery.co.uk www.riversidebeads.co.uk SALES Sara Vix 507 634 3143 Gill Teasdale Emma Shiells Nicole Stanley Media Account Consultant Email: [email protected] Gill is one of the Emma loves working Nicole is a scientist TO REACH US designers at with gemstones and with a love of all We love to hear from our JillyBeads and loves trying different types things crafty, purple, readers. experimenting with of mediums, though beadworked or Call us on +44 (0) 1903 techniques and inventing new ones. wire is her method of choice. bedgerigar-related. 884988 www.jillybeads.com www.adoringems.com hollybirdbeads.etsy.com Fax: +44 (0) 1903 885514 Or write to: The Editor, Bead, Sharon Wagner Cody Westfall Rebecca Unit 5E Park Farm, Williams Chichester Road, Arundel Sharon is a Cody is a designer West Sussex, BN18 0AG beadwork designer for Fusion Beads, Rebecca loves the US OFFICE: from Michigan, and who loves working endless possibilities Ashdown Inc., 68132 250th is the president of the with wire, though beads offer, and Avenue, Kasson, MN 55944, Great Lakes Beadworkers Guild. she also does bead embroidery. looks forward to learning more. USA yadasibeads.etsy.com www.fusionbeads.com www.beads-jewelled.co.uk Tel: 507 634 3143 Fax: 507 634 7691 competition soffice ashdown co Printed in the UK. Share your latest summer designs on DISisStNrib1u7te5d0-t1o6t3h6e. newstrade our Facebook page for a chance to win by Comag. some fabulous beading goodies! SMUABNSACGREIRPTIONS Simply post a photo and you'll be Email: [email protected] MRAATGEASZINE SUBSCRIPTION entered to win. For more details, check U1 SYe$a8r0(8 issues): UK £39; out Bead Magazine on Facebook. Monthly UK £3.99; US $7.99 DRAIGTIETASL SUBSCRIPTION Postmaster: Send address corrections to Ashdown Inc., 68132 250th Ave., Kasson, MN 55944 USA. Canada Post International 1USYea$r33(8.9i9ssues): UK £23.99; Publications. All rights reserved. Reproduction in whole or part without the written permission of the publisher is prohibited. The Single: UK £3.99; US $5.99 written instructions, photographs, designs, patterns and projects in this magazine are intended for the personal use of the reader and RBAETAEDSTV SUBSCRIPTION may be reproduced for that purpose only. Any other use, especially commercial use is forbidden under law without permission of the 1$4Y9e.9a5r: UK £34.95; US copyright holder. All editorial contributions in the form of articles, letters and photographs (b/w or colour print or transparencies) are Monthly: UK £2.99; US $4.99 welcomed by Bead but cannot be returned unless accompanied by a stamped addressed envelope. In any event the publisher can IMAG LIBRARY accept no responsibility for loss or damage to contributions. Material is accepted solely on the basis that the author accepts the SUBSCRIPTION RATES assessment of the publisher as to its commercial value. All material submitted to the magazine is accepted on the basis that copyright 1 Year: UK £43; US $65 of will be vested in the Publisher who assumes all rights worldwide, in all forms and media© Copyright ashdown.co.uk Monthly: UK £4.25; US $5.99 JUNE/JULY 2014 • ISSUE 55 ashdown6 beadmagazine.co.uk
welcome bring on the summer Warm weather is always greatly appreciated. Not only can you forget about wearing long pants and sweaters for a while, but the sunshine always seems to make things prettier and happier. Colours pop in summer, and they bombard you from all angles; whether it's a field of daffodils, a bright cocktail, or a new string of beads, there is plenty to inspire your jewellery designs to be bold and bright. This issue, we're bringing you to a Tropical Island! Let the pieces in this issue recall the sun, sand, and lovely blue sea found at any tropical paradise. Create a lovely French beadwork hibiscus haircomb designed by Julie Ashford, and bring the tropics to any outfit this summer. r grab some polymer clay and try Helene lewellyn's ower project for some added sparkle. Whatever your medium, we have a tropical project to please you. Wherever you are this summer, be it on holiday or at home on a weekend, let the sunshine and great colours inspire your next designs. And then share them with us, we love seeing what you are making. Let your creativity shine! Allison Roe [email protected] with us online Be Inspired Follow us on interest for fab jewellery inspiration. We have a brightly coloured Summer Inspirations board to get your wheels turning as the weather picks up and your thoughts turn to summer projects.The Big Bead Show Best Dressed BeaderStay up to date on all of the After reviewing all of thelatest show news! Catch a re- spectacularly dressed beaderscap of April's show, and keep at this spring's Big Bead Show,on top of announcements Susan Pochron was named Bestabout the show on ctober Dressed. See more entries on19 at Sandown Park. our Facebook page.JUNE/JULY 2014 • ISSUE 55 beadmagazine.co.uk 7
BE Dstash fboWeraIgNdria!nbAgsmgooanozdpini8eg9s.upCheck out these exciting products from yourfavourite shops, as well as the latest newsfrom the beading world. Swirled beads See Sharon New from Big Bead Little Bead, these Wagner's project monochrome polymer clay beads are featuring Crystaletts handcrafted, designed by Claire Lewis of Lottie of London. on page 78. With their black base and raised white extruded swirls, they are sure to draw attention. Also available in the reverse colourway. and ade o y er c ay eads a ai a e fro www ig ead itt e ead coCrystal buttons Neon Fire-PolishedCrystaletts have launched their new Fire Mountain Gems has justline of crystal buttons. Complete released their line of Czech Glasswith Swarovski crystals, these lovely Fire-Polished beads in stunning3mm buttons are avialable in 15 neon colours! These knock-outdifferent crystal colours and 3 metal beads look round from a distance,finishes. or f range of co o rs but a closer inspection reveals isit www crysta etts co their surface is lightly faceted. Made by Preciosa, these neon beads are available in four colours and a variety of sizes. ai a e e c si e y fro www fire o ntainge s coMy Magical Toadstool Originally a gift for her 2 grand-daughters, Kathryn Halfpenney has designed this magical toadstool to welcome the tooth fairy. The kit comes complete with step-by-step instructions for circular and tubular peyote stitch, as well as all the materials, including a fairy charm. A gateway into combining beading with paper-crafts, the presentation box is pre- printed, die-cut and pre-scored so it’s doable for all levels of beaders. The toadstool was admired by many at the Big Bead Show, Sandown ark on th April, when it was first launched, and is now available at www.halfpenney.co.uk.8 beadmagazine.co.uk JUNE/JULY 2014 • ISSUE 55
New colour options of beOsaevdSeestrpaa£Warn8mgId0eNa8kwn!9i,ot.srtfhromStarman has updated their extensive range ofshaped beads and added even more colourchoices. Their Lentil beads are now available in avariety of pearl finishes, including urple Velvet,Steel Blue, and Teal. Other shapes have also hadcolour updates, including the Mini Daggers, RosePetals, Bricks, 6mm and 4mm Fire-Polished, andTwo Hole Daggers. s for ech ate enti s at yo r oca ead sho Send your newest releases to [email protected] for a chance to be featured in our Bead Stash! Correction BEADLIFE Bead 55 featured an O wbBeWroedudigninhsgptsitrheweEdiitrhbpyfeatrbhsDueolnosautolsrhiaeDacsnhcdoe-fscastrwoaIrofitenebsdNe. aflddaeirrsimnGwtohtohaeirSdeinamgcvheliabunsomkehdtwaweaayaiisn1dngvewsIm0epveegurdoae0worasrLtsPle%setiahavjahsnyemclnemeirollwebidaettfnanhjoyeloeekedgbiDtdalcwnb.lilripuuuyneavIrteptptnrspo’igievtlhdd,yaynhctlune.ehbresleuacrogwbtruIsueaaenncyyoamr(llith.ereg.cwtGkaAedahsahepnatatdaiadadhaitdtytsrllirrohaaaslsrlvtetIetetheeaebgocntfilmenohllerfrBopgeaujoemuvroldeeasanrmooresaryinrowoffcnwicfdtvdmsek'uethargitets,esrshseIedbaseiiai.eokmtndenwtao'niiiigstnnvpendermgogoagreesfrauwstnasca)ddnhbsiteeabxbamunprmuteoeatpcnotyfnihyfkhoscgtuonoliwreeIheavaltuestpetcuoenkbofevcrssled.aunndirkgamsownvIvoaalenerldoweydatonamawef,aarcuopedcrdnnbbgyneaecrhuheeoea.esddopjnsxsvmoeImertt(eadewwrfakofahceroeuuytlrdteiayasierntpslllpcvlfsbedeoltsyeEcloeoreflsfi,fevrHdwbhauamat,ortscolrengtciehrloeiricyrotgsoem.rnaktile.e,aseaatawshcilnBkaevenikaneleIeshtssoctedinaisluseg.vttetyrwsrwsnuwfatbyhiOs,eedotoonrd4tclaaeohaEvid,nifeinrtylnosdstoeueesleatlsloehancIarldoawniqlefitgsldsumauseebobetiasuewnatilnttssccoo,ltveace,ihoa.i.ekohagknwuetrhtatMemneynstl,ehrnsoeaphym)altourteuyt,ucdsooellymiearomraleeaasmcddfursd.mnentslkthykihOblei,ahbnnfamiooparaenoMtbaoeegivfknivrnrgsrorfneescetasagof.ghihce,ecitfaIrtedeensweIhetclobfaedyaaoehjhruettewsslrfooibaseaygwenmedidrEshactgaeraasoeneelllncebsisslsdbessedtsorpms,laeeoruieeedayrawreaiwetchltideigddiinrguaaaisnbaadyoernitcdmpnIplirgeonrpnelhn.tbpidoseyucraemaemddaIsyraepshl.aidytieepeariMilrsdolsaaafrooclmyEslasltvevrlsdlltdoe,mu.srwseesaoobyeIleeb.re.HofisrrotmrriiacsouAwleowntaaemfawsfiamfirahatdcosg,anentlEnvrfnipeytsridsshaaarrmrdihndlde.ntmenndiroeeeaansnekmc’,icoietdmttlyoneiatoglbawiroaicwawndkgtgnseIaihnweltkhhdEteeesleneiheawymolaeitedfwoasabddaceothodsferfcfhnhsareaifstcioiroteauttdoaayeaendsaewhhetr.irnrplmmelhgfnsrhldemwsCvdrooiailmeeqteniaavieariurbdishnicoaarnnekurrgbnytreikekawuegmeyr,dletaeadelyedswepammaafadssatalrdciatiahbobnsemaylacaensevrid.tcnshd,mcadaeepmtth.ecwurileeroIeeatoe.ihlnilteafnplahutrodedlasfetrgrlteelllhearaslesli,snIg article on handmade weddings where two readers shared their experiences in making their own wedding jewellery and accessories. Photo wSPapfwfBcrercohkheiowetikmoohcundnttslonooditot'Bhfessgwweletrrihh'oklacsaeeeeenpssdxwaphtpcgDldoeeyheaesedfopgtfhadoKtoteooniirionusts1.tngtmh7a.eo,eWft e A16-17_1h6aanBdnomupdbfataettrdeeKooIanoIemnacorwOohushlsodkeetosnbaeAosduPs.mmvlttdrdnhtwsemhlMaioheedndesoaaooreeg£ilrr.nuvtutad.geetlreooibB2enitlchlamgteaagndsiwBed0heoiaarddrtzoBgn0eeafinlavkimunnsoospncgnty1eeithrohofgr6ssthsrroepatewoifedihbnek.tt3almDtccgbooIyiaeie0kftewen’ctocepdvnaohn0hspi.aealagek.lindrudpannurleeddIebehagetnalvi’kspv!mlcendcSwolIbe,ineylhsbnnakunacetrobisaysgnain-irrabre.nngaulbsys,dgk;iaaiIsnkgrssostetIdtgetteoasowuoadaot.m!karmnoygolwAfamdcisflofhyolneahdbeloluaktatstrtldweeehwn’hkerrtiatidd3ydeeidheniroednnidl,eranrmoa-tgagsadenowgosd,lneiyltmnra,lemdtthsehorgix.atseatestS,d-rk3r,awcpoeoemhuIcrw,iihoosiocnhmsowielackwcasnonsnshhNaehreviegguinyntdeewdliemtoaarhvnsbtrbhdsneloetuwceegarteuedaibrrocdnaiphdnbaeil-nsberheycutdtoedegitlasfbahteidnesiloruet,iDcrrhnsgdleevreghegemiaeeeigte,eaemnehesAtsnlahrteltwhdnsydarnie’ohraltp.wgealynetiiedvttemIinnmtcnk,aidahenarsofoggiaeromseionasknusrmmentdsf,mtuldsipicgwyacidndewmhgepkbadhiydiegeunrheylteaeitiaseoksphsnrlnoir,athInlteggsrehyhtImcothinw,v,wvothnerseddeoebheeebmuaheogsredgireauen.udgIsoyfiysama,'tIt.ItthbGc,derntttewflsthgoslybthdacopidhabar'oatapoayumonewunaeSceeaw,vemntltmtynnnhchydlollaeiebyedtyele’iraadoatbebn,de'uyaedcerH,twaddkdlemtemialsstthtseisntjfdFarthisideineotpoersoeniiiowtdtgua'ebeooriontawmaheuubrgnnteeanbcdteemiIirrptcLcwremuinmtmsnenhkavtahffeeyekhiahmodimhblt’isa,edMacddatg,lelptpaeetfmtdeilnreedbaams-obncShyenik,dspcywtrrlctlwnueutnaugcohiwee.eioayeoeftdblttgdmdsaiehteyrosrnooier,trnaiFyestaneseaatilefomordfborsIwte.a,rfldrvtowHol,kmhayaetmrtteiwpomoerbIvre,onitnaisflnrwleueaoetssyaIt/igeicaemha!dkr,hogasmrcsehdptmtdnaioiwtetrbarDvhtteflaeamni’seribdthieatameegsceksooddhaarenemkesrorvchadrewnWdybaiee-odaeegswnobaydKe’ttektrEose.utdnielhhtIsaeyerDoqesbmphineaaIasdbdeen.rDuuwhleyuuedtmmresm,fugIeettoaafltis.WeNciaivssdmsiitpdearwmeowoGaflibne.hhSeskenuileuswraFaotgieviacseywSelgttyanmdlmeuIlu,oe.ehhlPafnatdeisvrtsr-aEsyt.tadrstiecadkhmtCtomoi,sainrjhdoreoaeneIvmmelAidseplnwslagameu.wLmlkalkmbh!etWsemhegpi2aahfdeoaa,lou-n0ynalpiadnuaechawn1lSleadetytleros4egstgmywaoeylitb,nIscpefir,•oceaameltlodaigfurIashIrytncaSmonl,oumcroyidltehkSuedfianhvor3upsaUdphensw/sngic,2’ldmprnsktEwud6ioiyeepam.s/sigso1olm5doykiehtob4apln4uehrdeanveustaaeknreiwe1denertdtanl:trchh0sgrdoesmgo1nkA.leecl;affnPolehocaadsbMcnaatPncsrkecekiheanlahaoseadt,,eBcos--wduegilrrivrawtipdehahgrseb.yQuick kits WEDDING SPECIAL • ISSUE 54 16-17_handmadewedding.indd 17TierraCast has recently come out with Quick Kits. Showcasingtheir new Leather Findings II products, these bracelet, necklace, beadmagazine.co.uk 17and earrings kits come with all the components you need tocreate a finished piece in a matter of minutes. Step-by-step 3/26/14 1:02 PMinstructions are included as well, featuring diagrams for the knotsalong with a website to check out video instructions. They've just Anniversaryreleased even more designs, alll cute and super trendy. This July, Spellbound Bead Co will be s yo r oca ead sho for ierra ast ic its celebrating 30 years of business! Seeing as 30 is the Pearl Anniversay, they are Chain maille kits giving away free pearl projects to download during the entire month. Weave Got Maille has come out with a great They are also doing daily Facebook new line of kits. Every kit comes stocked with giveaways, special order giveaways, treats everything you need to make the finished in the shop and in each parcel, a newly revamped website, and a project project. We tested their fun That's How I fundraiser to support a Guinea Pig rescue Roll necklace, a fun whirlybird-style centre. pendant. The instructions are easy to or ore infor ation ease e ai follow, and their components are high- christine s e o nd ead co quality. The kit comes with a stain cord, but we think the pendant could be jazzed up with something a bit more spectacular. or ore it o tions isit www wea egot ai e coJUNE/JULY 2014 • ISSUE 55 beadmagazine.co.uk 9
Visit our shop open 7 days a week Fusion Beads, Inc. in the Craft Centre, High Street,Market Deeping, Peterborough, PE6 8EB New rose gold findings, shamballa style magnetic Where your clasps & glass globes now in stock jewelry begins. 01778 346810 • [email protected] It starts right here at Fusion Beads! www.riversidebeads.co.uk We offer all the best beads & supplies for your beading projects, hundreds of Find us on Facebook - www.facebook.com/RiversideBeads step-by-step techniques & over 1700 FREE Inspiration project designs. Unleash yourCard Making & Scrapbooking Specialists www.riversidecrafts.co.uk • 01778 344550 creativity & come bead with us! Go to the link below to save 15% on your order over $50. (Limit one use per customer. Exp 6.30.14) FusionBeads.com/WeHeartUK e ns ired scan e African Seed Bead Hanks £1.95Tangier Green Bead Strand £2.50 Agadir Beach Pebble Mix Sweetie StrandsCasablanca Dusk Bead Strand £2.50 £1.95 £1.2510 beadmagazine.co.uk JUNE/JULY 2014 • ISSUE 55
FASTFASHION Designed by Gill Teasdale3 Slip remaining ponies onto the end of each bunch and tie a knot to stop them falling off.Secure necklace with a pretty bow! 2 Separate the strands into two – white and green in each bunch. Onto one bunch thread a white, an orchid, a gold and a turquoiseBEADstore pony. Repeat twice. Thread a round and a turquoise pony. Tie cords in a knot next to last• 1 x Fimo pendant pony. Repeat on other side. desert ora desert flora• 3 x acrylic giant Whip up a fun and irty holiday necklace that’s a breeze to make! holed rounds antique gold• 8 x pony beads turquoise• 8 x pony beads soft sheen orchid• 6 x pony beads soft sheen gold• 6 x pony beads opaque white• 1 x oval jump ring antique gold• 1m x 0.5mm waxed cotton cord white• 1m x 0.5mm waxed cotton cord sea greenTOOLbox• Round nosed pliers• Chain nosed pliers• ScissorsSUPPLYshop• All supplies from 1 Slightly open the jump ring, slip it through the hole in the JillyBeads• See page 89 pendant. Close. Thread both cords through ring. Line up the ends and thread them all through a round. Push it down to the pendant.time&moneyMake in under30 minutes forless than £5.JUNE/JULY 2014 • ISSUE 55 beadmagazine.co.uk 11
BEADWORK Designed by Nicole StanleyBEADstore SfaUllenNaSt ET• 10g x size 11 Toho mattegalvanised rose gold F 1F A• g x size 1 Toho gold B Use cubic right angle weave to create thislustered dark topaz statement pendant necklace featuring elegant teardrop motifs with a splash of crystal sparkle!• 10 g x xize 11 Toho mattegalvanised orchid F 3FC• 1g x size Toho silver-linedcrystal 21 Focal bezel 3. Add a second A bead and then• 1 x 12mm Swarovski crystalrivoli rose gold 1. Using a comfortable length of pass through the A bead first exited in step 2 to complete the first side• x mm jump rings antique Fireline and leaving a short tail for and set of 4A beads of the joiningcopper weaving in later, begin beading a C AW unit. ass through the next A CRAW rope using your A beads. bead in the ring as you would• 1 inches x x mm link Continue until your rope is 15 units normally in CRAW ready to work thecable chain antique copper long. This rope will now be joined into a ring to create the rivoli bezel. 2nd side.• 1 x lobster clasp antiquecopperTOOLbox• 6lb Fireline crystal• Beading needle size 12• Scissors• 2 pairs at nosed pliersSUPPLYshop• Seed beads from Jencel• Rivoli from Perles and Co• Antique copper findings from Big Bead ittle Bead• See page 89DESIGNnotes 2. Ensure your rope is laid at on 4. To complete the 2nd side of the• The original ‘Fallen’ necklace was your mat. To begin the joining unit joining unit you will only need to add your thread should be exiting the 1 bead instead of 2 in a normalbeaded in metallic purple and teal end A bead of the side of the cubic CRAW rope stitch. Depending onto make a real statement! You could rope which is facing uppermost. which direction you are workingalso use just one colour of size 11 Add 1A and then pass through the around the ring, this 2nd side will befor the CRAW framework with a next A bead in the first side of the either on the outside or the insidebright contrasting colour crystal and cube – this bead is on the tail end as in my example of the bezelsize 15s. of the rope. frame. Add 1A and then pass• I love the versatility of cubic rightangle weave and how it can be botha uid rope or be turned into a solidframework. Once I’d started beadingthis simple teardrop shape I kept onexperimenting with joining themtogether in different ways to create astriking, almost tribal-looking design.time&moneyMake in around 6hours for under £10.12 beadmagazine.co.uk continued over JUNE/JULY 2014 • ISSUE 55
\"We love this beadmagazine.co.uk 13 combination of shapes and colours.\"JUNE/JULY 2014 • ISSUE 55
through the next 3A beads in this 7. Working in circular peyote stitch, 9. Place the rivoli inside the bezelset of A. ass through the next Ain the ring and repeat to complete add 1B and then pass through the facing upwards. To begin capturingthe 3rd side of the cube. next B in the ring completed in step the stone add 1B, then pass 6. Repeat 15 times to complete the through the next 2A beads on the5. All the joining beads have now ring, step up through the first B inside edge. Repeat 7 times to added in this step. complete the first round. Step upbeen added. On the 4th side of the through the first B added in thiscube, pass through the set of 4A step.beads in the normal CRAW threadpath in order to complete the joinand close up any remaining gaps.Finish with your thread exiting an Abead on the inside edge of thebezel ring as shown. 8. Work a second round of peyote 10. Add 2B then pass through the stitch using your size 15 charlottes next B bead in the ring created in to complete the back of the bezel. step 9. Repeat 7 times more to Weave through your work so that finish securing the rivoli within the your thread is now exiting an A bezel. Weave through your work so bead on the inside edge at the front that your thread is exiting an A bead of the bezel. on an outside edge of the bezel ring.6. Add 1B and pass through thenext inside edge A bead in the ring.Repeat 15 times to complete thering. Step up through the first Bbead added in this step. 11. To cover the thread from your CRAW stitch on the outside edges of the bezel ring, add 2B in each gap between A beads. Do this on both the front and back of the bezel ring, finishing with your thread exiting an A bead.14 beadmagazine.co.uk JUNE/JULY 2014 • ISSUE 55
12. Work one CRAW unit – this unit Weave through the final unit so that covers up the visible thread from you are exiting it at a right angle as the original CRAW stitching. Oncewill be at a right angle to your bezel shown. Continue in CRAW for a complete, weave through to theframe. Begin the first side of this further 10 units. outside edge of the teardrop frame.unit by adding 1C, 1A and 1C,working in the normal CRAW thread 15. Using C beads only, join the 18. Fill in the gaps between Apath. Complete this unit such thateach of the beads in the top ring is working end of the rope to the bezel beads on the outside edge using Ban A bead. ring in CRAW to match the join beads. In my example I have used created in step 12. You will join the a repeating pattern of 1B, 2B, teardrop frame to the bezel so that repeated around the outer edge. At there are 5 units at the top of the the tip of the teardrop point add 3B bezel ring between the two joining to create a picot. Repeat steps 17 points as shown. and 18 on the other side of the beadwork.Large teardrop 16. Weave back through your work 19. Weave through the teardrop13. Complete a second CRAW unit to continue the teardrop frame rope. frame so that your thread is exiting Bead a further units in C AW and one of the two inner A beads on theusing A beads only. To begin the then complete the frame by joining outside face of the CRAW unit whichouter teardrop frame, instead of the ends in the same way as for the lies directly above the C bead joincontinuing the rope in its current bezel ring. Finish with your thread to the bezel. Add 1C, 1 x sizedirection, weave through the unit exiting an A bead on the inside bead and 1C, then pass through thejust completed so that your thread is edge of the teardrop frame. 2nd inner A bead of this set in theexiting the edge A bead which is at opposite direction. This creates aa right angle to the 2 units just picot with the size 6 bead at itscompleted and effectively runs point.‘parallel’ to your bezel ring.14. Continue in CRAW for a further 17. Work around the inside edge of10 units. To create the point of the the teardrop adding 1B into eachteardrop you will again need to gap between two A beads - thischange the direction of your rope. TOPtips • oining can be a little tricky at first, but keep in mind your usual CRAW unit thread path – you will be following the same path as you join, but some of the beads you would usually add are already in place as part of the unit you are joining the working end on to.JUNE/JULY 2014 • ISSUE 55 beadmagazine.co.uk 15
At the point of the teardrop add 3B to form a picot. Leave your working thread for attaching to the main pendant. Make two more teardrops in the same way. 23. Weave through the teardrop so your thread is exiting an outer A bead in the unit which is 5 CRAW units along from bottom point. Using C beads begin a new CRAW strip coming off at a right angle from the teardrop. Bead a total of units and then join this section to the large teardrop pendant at the CRAW unit which is 2 units to the right of the central point unit.20. Add 1C and pass through the Small teardrops 24. Weave through the largesize 6 beading in the opposite 21. Using A beads, create a teardrop frame shape so your threaddirection as in step 19. Add a is exiting an outer A bead on thefurther 1C and then pass through CRAW rope which is 13 units long. CRAW unit which is 2 units to left ofthe A bead first exited at the Form a teardrop shape by joining the central point unit. Create a 4 unitbeginning of the previous step. the working end onto the inside CRAW strip and then join this backPass through the picot thread path edge of the tail end of the rope as onto the smaller teardrop at the pointonce more in order to reinforce this shown. shown – there will be a 3 unit gapsection (it will be used to linkcomponents . epeat steps 1 and20 at the other join between thebezel and teardrop. Weave in yourthread ends. 22. Fill in the gaps between A beads by adding 1B in each gap around the inside edges and 2B in each gap around the outer edges.16 beadmagazine.co.uk JUNE/JULY 2014 • ISSUE 55
between the two joining points. Fill in peyote using B beads. Step up all the embellishment beads addedthe gaps in the C bead CRAW strips through the 1st B bead added in in this step again. Weave in threadon both sides of the beadwork using the round. ends. Make a second peyote ring1B on the inner edges and 2B on the in the same way.outside edges. 28. Change to C beads and work a 30. Using your at nose pliers, link25. As in step 23, create a 4 unit further 3 rounds of circular peyote. Weave through your work to exit a B the main pendant to a peyote ringlong strip of CRAW in C beads on bead at the centre of the peyote on each side by threading a jumpthe second small teardrop. This ring. Work a further 2 rounds of ring through the size 6 beads.section will be attached to the main circular peyote in C beads on the Thread another jump ring throughpendant frame at the CRAW unit inside of the ring. Zip up the peyote the second size 6 bead on eachwhich is 7 units to the right of the ring following the peyote stitch peyote ring and join to a length ofcentre point. Bead the join and thread path. chain. Add a lobster clasp to onethen weave through the pendant side of the necklace chain and aframe so that your thread is exiting further jump ring to the other foran outer A bead on the unit next to fastening.that which the previous smallerteardrop is joined to. Continue as instep 24 to add the second C beadCRAW strip, attach it back to thesmall teardrop and fill in the gapswith B beads.26. Using the third teardrop, 29. With your thread exiting a Crepeat step 25 – this teardrop will bead from the central round ofbe attached to the left hand side of peyote, add 1 x size bead andthe pendant in a mirror-image of pass through the next C bead inthe teardrop added in the previous this outer round. Add 3B and passstep. Weave in your thread ends. through the next C bead to createThis completes the main pendant. a picot. Add more sets of 3B, then 1 x size bead, followed by a further sets of 3B. ass throughCircular components TOPtips27. Starting with an initial ring of • Different colour/brand size 15s may3 B, work one round of circular differ in size to those used in my example. When filling in the gaps in the CRAW stitch you may need to add more or less size 1 s in order to fill each gap or to prevent the teardrop shapes from being distorted.JUNE/JULY 2014 • ISSUE 55 beadmagazine.co.uk 17
Kumihimo disks Neon elasticMini foam kumihimo disc, 11cm 0.8mm diameter covered elastic diameter £2.50 each. thread in a variety of neon colours. www.riversidebeads.co.uk 1m 20p, 10m £1.50. www.spellboundbead.co.ukTSuRmAmVer ELS Tool storage Keep up to 9 pliers and cutters organized and in one place, in black or purple. £4.75 each. www.shipwreckbeads.comWith nice weather comes a desire to travel. There'sno need to leave your jewellery projects behind; theseproducts are designed to make your projects portable. Travel caseBeading Pal travel carrying case and work mat available in a variety of colours, £60 each. www.ezelfindings.com18 beadmagazine.co.uk Bead storage Proper ont-the-go see-through storage for your beads, 40x100mm. 75p per piece. www.shipwreckbeads.com JUNE/JULY 2014 • ISSUE 55
Actual Size Golden Glory bracelet featuring CzechMates Triangles and Halo finishes by Starman TrendSe er Nichole Starman. Vibrantly saturated jewel-tone colors within shimmering layers of gold dust. Also available in Firepolish, Rose Petals, CzechMates Bricks and Lentils.371-06-29256 371-06-29253 371-06-29270 371-06-29267 371-06-29263 CzechMates™ 2-Hole Cardinal Sandalwood Linen Heavens Shadows Beading System Tile Dagger Brick Lentil Triangle371-06-29266 371-06-29264 371-06-29261 371-06-29260 371-06-29259 Consistent hole spacing ensures Azurite Ultramarine Regal Madder Rose Cherub no warping or bunching.Bead Stores—Register as a ResellerEUROPE: Koralex Wholesale: +420 483 360 288 · www.CzechBeads.eu · [email protected], ASIA: Starman Wholesale: +1 888 683 2323 · www.StarmanInc.com · [email protected]
BEADWORK Designed by Julie Ashfordhibiscus haircomb BEADstore Using a traditional Venetian beadwork technique make these everlasting tropical • 10g x size 10/0 seed beads blooms with seed beads and soft wire. silver-lined magenta A n ibiscus ower 7A to one side of the 6A. Wrap off the curve to the straight wire above • 2g x size 10/0 seed beads 1. The wire is used as one long the 6A with one rotation at 90 degrees to the straight wire silver-lined purple B length, trimming as necessary, to (Diagram 2). create five separate petals. Starting • 10g x size 10/0 seed beads with the 0.5mm dark purple wire, 90˚ put a twist at the far end as a orange-lined topaz C stopper. Thread on 50cm of A 45˚ beads. • 2g x size 10/0 seed beads Diagram 2. 2. Fold the threading end over into silver-lined red D 4g. 1 up 7A. g2 a similar g3 a 1cm loop. Bring up 6A beads to Bring Make • 3g x size 10/0 seed beads within 20mm of this loop. Make a 60mm long loop below the beads. bend to frame the other side of the silver-lined lime green E Pinch the two sides of the loop together just below the beads and 6A with 7A. Wrap off this curve to • 4m x 0.5mm soft-tempered twist the long loop to make a rope stem (Diagram 1). the rope stem at 45 degrees wire dark purple 90˚ (Diagram 3). By making the90w˚rap at • 1.25m x 0.315mm soft- 45 degrees you will shape the petal tempered wire dark purple into a point at this end. g7 • 4m x 0.5mm soft-tempered 45˚ 90˚ wire vivid red 90g˚ 6 • 1.25m x 0.315mm soft- Diagram 1. 45˚ g4 g9 tempered wire vivid red g1 g2 g3 • 2.5m x 0.5mm soft-tempered 3. Bring up 7A to the base of the Hawaiian HibiDsiacgurams 3. Hagi2rcomb g 3 wire chartreuse 6A. Make a smooth, neat bend in continued over g 4 • A haircomb or barette-style the wire to make a curved frame of g1 hairclip for info - all gs are grouped (not the g number) if you TOOLbox need to edit the text within gs 2 to 5 you will need to ungroup • Wire cutters JUNE/JULY 2014 • ISSUE 55 SUPPLYshop • All supplies from Spellbound Bead Co. • See page 89 time&money Make in under 3 hours and for under £10.20 beadmagazine.co.uk g 7any queries or if you want changes let me know and I’ll do it for you if you wish julie
JUNE/JULY 2014 • ISSUE 55 beadmagazine.co.uk 21
90˚ g 7 90˚5. Bring up 14A. Make a bend to 8. Asdpdogoml 6aonred A beads to the wire on 13. Cut 50cm of 0.5mm chartreuse make four more 90˚form a snugly-fitted curved frame the wire. Hook the last 1cm of this wirearound the first A. Shape the cur9ve0˚ pe4ta5ls˚ to match. through the base of the bud andso the wire crosses the straight wire 9. Cut 25cm of 0.315mm dark thread 20E onto th4e5l˚ong end. Wrapat the top at 90 degrees. Makingnote of the direction of the previous purple wi4re5.˚Thread on 1B and twist tbhuedbteoafdogsrma9rtohuencdatlyhxe. base of thebinding (to keep things neat) wrap to make a 7mm stamen in the Continue tooff to the straight wire as before centre of the length. Thread on 1B wrap neatly along 4th5e˚ stem for 30mm (Diagram 10). (Digagr1am 4). g2 baHnadsaemgowafkt3ehaeaifisirisamt.ilnarepsHteaamtietbhnreaiestgtmhceo4ure s g5 Haircombtimes (Diagram 7) and set aside. 90˚ g2 g5 Make four mgore3stamen sets. g 4 g1 for info - all gs are grouped (not the g number) if you45˚ need to edit the text within gs 2 to 5 you will need to ungroup 90˚ 45˚ any queries or if you want changes let me know and I’ll do90it ˚for you if you wish julie [email protected] Diagram 7. Diagram 10. Diagram 4. g1of50th.eMfiarkset satag2mme7mn twist at the base 14. epeat to mgak1e0agse8cond bud set. Bring up theg 3 g 445˚ on a 20mm stem. Bringgth8e two second set to the bgas7e45o˚f this twist 6. Bring up 16A. Make a curve as stems together and wrap with both and twist all four wires together for chartreuse wires together to make a before to cross the twisted stem at 2mm. Bring up the third set and 45 deggree6s. Wrap it off to complete a second frame (Dgia6gram 5). repeat, and the fourth and the fifth. 30mm long thicker stem (Diagram 11 . epeat with the C beads and g2 g3 gTw4ist all ten wires togethegr 5for the red wire.90˚ 40mm (Diagram 8). g9 g7 g8 g9 45˚ 90˚HawaiHiaanwaHiiiabnisH9c0i˚ubsiscus g8gH9aircoHmaibrcDoiagmramgb57.g 4 7. You need to adgd 5a third and 45˚for info - all gs arfoerginrofou-paelld g(nsoatrethgreougpendu(mnobt ethr)eif gyonumber) if you Diagram 8. need to edit the tneexetdwtoithedinit thgeste2xttow5ithyinou gwsil2l tnoe5edyotou will need to11.6 fuonugrrotuhp conceunngtrroiucp frame in9a0˚similar Bring the five pe90ta˚ls together 45˚s fwadjurnoalayieimtyqfu.oeerTryiareoysunoid2fr yi0fo2yAudaj6uonowluAyiaeitiqwsnfuhoaaedrnnryiteod2sucoh2if2raAyinf8oyguAofewuosiwfrsloheatntrhtmtechehaeknnnegoexwstlaent dmIe’llknwsowtiatahnmdteI’hllne ou [email protected] stamen in the centre – the gg 1111 should show 20mm of plain g 9outer frame – you may need toto [email protected] 45˚ g 5Diagram 11. I’ll adjust the begad1counts to get ga 2 45ro˚ pe. Twist together at the base Assemble the comb smooth fit. Finish with two neat aHfigrnimbd1ils1ytch. uesgevpwiv3eiitdahtrtethodegmwCa1irake0eng. da1Ds0ebgceoa4ndds 15. Pair the A bead Hibiscus withwcaoiimanbtwtHohrea3ipmtbosgmpib,s1eatr0cgnnimedu1attstuhhectkhseiunngpgdleee8tarsltthrgaaeni2gdehdttrgiwmei.roeAf t Fglow3 er bud g4 thegB5bead buds and bind togethergs are grouped (not the g number) if you 12. Cut 30cm of 0.5mm purple wire. with the tails of the chartreuse wire just behind the ower head. epeatthe petal (Diagram 6).the text within gs 2 to 5 you will need to with the other ower and buds. Trim the Hibiscus stgem8s to 12mm and Make three individual 19A loops in a place together (facing opposite directions) on the comb. Bind intoor if you want changes let me know and I’ll cluster at ltohoepcsgetno7tgreetohfetrhientwgoira1e.1 placge 8with the bud stems andif you wish Bring the neaten with a final wrap using theoundbead.co.uk remaining chartreuse wire. g 10 narrow bud-shape (Diagram 9). JUNE/JULY 2014 • ISSUE 55 g6 g7 g6 g9 Diagram 9. Diagram 6. g 11 g9 Hawaiian Hibiscus22 beadmagaHzinae.icroc.uok mb Hawaiian Hibiscusfor info - all gs are grouped (not the g number) if you
JUNE/JULY 2014 • ISSUE 55 beadmagazine.co.uk 23
george weilfine art & craft supplies fromTools and mediums for the experimental jewellery designerand crafter including Art Clay Silver clays, Sculpey and Fimopolymer clays, DAS air dry clay, Gedeo Resins, Merinowww.georgeweil.comwool, silk yarns, fine silver findings... George Weil & Sons Ltd, Old Porsmouth Rd, Guildford, GU3 1LZ Tel: 01483 565800 Email: [email protected] Europe’s leading suppliers of Lampwork glass & tools For more informationCall: 01262 420171 or Email: [email protected] beadmagazine.co.uk JUNE/JULY 2014 • ISSUE 55
Beading In The Summer!C Beads FindingsMYCMMYCY Kits ElectronicsCMYK Sundries Tools For a selection of summer patterns Exclusive patterns & 1000s of beading supplies: and shop items just visit: www.threadabead.com/ad/summer www.ThreadABead.com JUNE/JULY 2014 • ISSUE 55 beadmagazine.co.uk 25
BEADPROFILE Duomos Romanticos Double bracelet. Marcia DeCostermteaomcheanbtlseAmerican beadwork designer Marcia DeCosteris an international superstar who lets the beadsinspire each of her intricate jewellery pieces.Marcia DeCoster is a woman Born on the East Coast of the supporting herself with beads. “I love who needs little introduction. United States, a job o er took Marcia to design and share through teaching Most people in the bead across the country to California where and kits for many of my designs,” sheworld recognize her work she met her husband. 27 years later, says. She works primarily inimmediately—her intricate beadwork and she still calls California home. beadweaving, though she doesdesigns will stun you with their perfect She and her husband live near San occasionally wander into beadcolour choices and beautiful nishes. Diego with Miss Princess Maya, their embroidery territory. “I nd the act ofMarcia took some time out of her ten-year-old Chihuahua Daschund. picking up one or two beads at a timedesigning schedule to chat with us and stitching them into a fabricabout herself and her beadwork. In 2004, Marcia gave up her day provides a level of relaxation, as well as job and took on the exciting task of a level ofGreen cuff and earrings. excitement as a piece takesInset: acific Morning lory shape.”bracelet. Before she started beading full time, Marcia would teach occasionally on the weekends. Since 2004, however, she’s taken o , teaching many times during the year. “Teaching forces one to think through continued over
the best way ofapproaching a project andbreaking it down intoteachable moments,”Marcia says. “I also loveseeing the di erentcolour combinations andintriguing variations thatpeople create from mydesigns.” And thetravelling, and meetingother beadlovers, is abonus of making a livingwith beads.Marcia’s process shipping, and website details of the Santa Lucia necklace.Everyone nds business.” Working in a large studioinspiration in a di erent space allows Marcia a great freedom Bird ring.way. For Marcia, ideas to design. One entire wall iscome through bead play: dedicated to holding crystals and La Navette“Sitting down with beads and then seed beads, a centre table is available bracelet andplaying with the shapes I have created for students, and a bookcase holds a earrings.often result in a new piece.” She plethora of inspiration. It’s only after acomes up with fabulous components third trial run of a design that Marcia beadmagazine.co.uk 27that work well on their own, as an sits to make her illustrations; “I ne-earring or ring, but also work when tune the thread paths with eachcombined in larger jewellery pieces. iteration.” Not one to work exclusively on herown, one of Marcia’s favourite piecesis called Oz, and is a collaborativepiece with Sherry Sera ni. Maricacontributed a large selection of one ofhercomponents,Spirit Flight,which Sherryused to make abeadembroideredand fringedcollar. ough shedoes all of thedesigningherself, Marciasays she doeshave peoplewho makesamples andtest herdirections forher. “I am alsofortunate tohave myhusband Markhelp with all ofthe kitting,JUNE/JULY 2014 • ISSUE 55
Casandra bracelet. enough, she also has a number of Marcia is always looking toInset: Marcia's working space. designs oating around her head, but the future. She’s ready toBelow: An incredibly organised she hasn’t managed to nd the time rework some previousarray of beads. yet to create them. “Time is always a designs with new techniques factor, especially for larger pieces,” she and colours, updating some Her incredible designs have admits. “ e things I design to teach old favourites in the process. been published in numerous books seem to just create themselves in my 2015 will be a year of travel, and magazines, including Marcia imagination and then get beaded.” and 2016 will be focused on DeCoster’s Beaded Opulence, Beads in Motion, and the newly released Like any good designer, however, the aforementioned Marcia DeCoster Presents. redesigning. “I think it At the moment will be an interesting Currently, Marcia is at the centre of a exercise to bring 25 years balancing act. She is organizing her of beading experience to workload to “balance the illustration/ tutorial writing, ordering of supplies, the table and improve kit-making, travel arranging and on each design to make sample making.” As if that weren’t it the very best it can be,” she re ects. She o ers up a bit of advice for beadworkers of all kinds: “If you have the desire to create, you will always enrich your life by honouring that desire. Make the time to build a set of fundamental skills in your chosen medium, and keep creativity at the forefront of who you are.” SEEMORE Visit Marcia's website www.marciadecoster.com28 beadmagazine.co.uk JUNE/JULY 2014 • ISSUE 55
The Cornwall School of Art, Craft and Jewellery, based nearBodmin in Cornwall, runs a wide variety of classes all year roundfor all levels in a beautiful, countryside location close to beachesand tourist attractions - the perfect location for a creative break! Check out our Range of Classes for all Levels!Sterling Silver Clay3rd-4th June, £250Polymer Clay Introduction8th June, £60Metal Clay Intensive Week14th-18th June, £600Texture Making26th June, £125Adding Colour to Metal Clay27th-28th June, £190Felt Bead Making29th June, £26Terry Kovalcik, Hidden Locket Master Class 22nd-25th August - £1058.82This is a four day advanced level metal clay workshop. In this workshop, we'll learn how to create Terry's new locketdesign — a technique that integrates the hinge into the frame of the locket. The friction-style clasp is tucked away intothe side of the locket that opens the lid at the top. The lid and hinge are concealed in the frame leaving the front andback surface as blank canvases to embellish. The techniques covered are template/pattern making, dry construction, constructing an integrated hinge, drilling, appliqué, riveting, fabricating with wire (clasp and bail), finishing and patina. Each participant will learn to cut the elements accurately and assemble them to create the final box. Once the carcass of the box has been fired, each participant will learn how to use sterling wire to create and attach the hinge pins and some of Terry’s other decorative tricks. The course price includes a unique tool kit which has tools hand made by Terry. These will be used in the construction of the locket and are yours to take away. This is the first time this class has been offered anywhere and is a must for serious metal clay artists.www.csacj.co.uk beadmagazine.co.uk 29 JUNE/JULY 2014 • ISSUE 55
POLYMERCLAY Designed by Christi FriesenBEADstore cryHstaEl ARTS Whip up some hearts using polymer clay, and then• Polymer clay in jazz them up with some crystals. Perfect as a brooch, pendant, or even as a keychain. any colour (I used a combination of 1. Begin by conditioning your clay. Press or straw. oll gently and let your fingers slide White Glitter and up and down along the clay to keep the Peacock). I roll the clay at, then fold and roll press snake smooth and un-lumpy. The snake recommend repeatedly until the clay is soft and the should be about 5 or 6 inches long. Premo™ colors mixed. Using a clay-conditioning machine set on the widest setting makes• 2 x at-back, this task quick and easy, but you can do it by hand or with a roller if you prefer. I've glass rhinestone used a mixture of White Glitter and Peacock crystals (preferably coloured clay. with Hot-Fix backing) in 2. Blend until the clays are mixed together 4. et’s make the centre bend first. It’s assorted sizes (from 2mm to to form one colour, which should also make easiest to use a tool with a wedge-shaped 4mm) in one the clay soft and exible. It’s ok if there are edge (I recommend one of my favorite colour, or in some steaks of colours in the mix. tools, the “Gotta Have It” tool!). Find the several similar middle of snake and lay it over the tool’s colours to match edge. Use your fingers to press the clay your clay over the tool, pinching it at the bend. If it looks like a bentTOOLbox straw, you did it correctly!• CF “Gotta Have It” 3. Pinch off some of the blended clay and sculpting tool (or roll it into a ball. With your hand, roll that ball similar tool with a into a log. Use your fingers to roll that log wedge-shaped thinner, into a snake about as thin as a soda edge)• Clay-conditioning machine (or roller)• Crystal-picker tool (optional)• Oven and oven thermometerSUPPLYshop• All materials from Palmer Metals• See page 89time&moneyMake in under 2hours and forless than £5.30 beadmagazine.co.uk JUNE/JULY 2014 • ISSUE 55
\"Load up yourlove with somesparkling crystals.\"5. Lay the bent snake on your work surface 6. Bring the ends together and press them FUNfactwith the point down. Now just pull the ends firmly to finish the heart shape. • Rhinestonesdown gently, keeping curved bumps at thetop, like a cursive lower case letter “m”. were originally rock crystals gathered from the river Rhine, hence the name. Their availability was increased in the 18th century when a jeweller had the idea to imitate diamonds by coating the bottom of glass witih metal powder.JUNE/JULY 2014 • ISSUE 55 beadmagazine.co.uk 31
7. Pinch off the excess and form it into a 9. Push the crystal into the clay with your point. Smooth with your fingers. Cool, huh finger or the end of a tool. You’ll want the You can make your heart short and fat, long crystals to embed themselves just a bit into and lean or curvy! Or make some of each! the clay so they won’t slip off during baking.\"loved ones Adding Crystals 10. Add as many crystals as you want, ainspire meto create\" 8. Of course this heart just like it is fun, but lot or a little. I added a row along one side, then a few extras wherever they looked• My daughter it’s way more fun with sparkly crystals! I nice.and daughter-in- suggest you gather about two dozen glasslaw were my rhinestones, the at-back kind with Hot-Fixinspiration for on the back, if possible.this piece. Ibegan thinking Just pick up a crystal and press it ontoabout good the surface of the clay. If you have a crystal-times and loved picker tool, it’s easier (or even a tooth pickones. I was with a bit of beeswax on the end).especiallythinking about Bake the piecemy girls andhow much I love 11. Preheat your oven to 130ºC (275ºF) ifthem. I wantedto make a little you are using Premo™ clay (or accordingsomething for to manufacturer’s directions if you are usingthem to remind another brand). Use an oven thermometerthem that they inside the oven to monitor the temperaturewere in my accurately.heart, and thissweet little idea 12. To make this piece wearable, all youpopped into myhead. have to do is string the heart on a ribbon or a chain. That was so easy, wasn't it et's make a bunch more and give them to everyone!32 beadmagazine.co.uk JUNE/JULY 2014 • ISSUE 55
Ask For Us At ® Your Local Bead Store Quality in the Making ©Original cast designs copyright protected TCI710 Lead Free Pewter ~ Made in the USAJUNE/JULY 2014 • ISSUE 55 EU Nickel Compliant ~ Original Designs Creative omponents you will love BEADS BAILS SPACERS CHARMS CONES JUMPRINGS EARWIRES TOOLS LEATHER WWW.TIERRACAST.COM beadmagazine.co.uk 33
Now Officially Our Fastest Selling Bead Range Ever ” TotallyBeadsCheltenham Saturday 31st MayGuildfordSaturday 5th July Visit our website for more info www.totallybeads.co.ukwww.thebeadtour.co.uk New Kits online every week34 beadmagazine.co.uk JUNE/JULY 2014 • ISSUE 55
® Jewelry designed by Meredith Roddy new charms, pendants & links spikes, chainmaille & neon beads ™Tabletop Knotter Tool Patent PendingNEW! Purple Moon Beads 39 High Street Ventnor Isle of Wight PO38 1RZ Tel: 01983 852473 www.purplemoon-beads.co.uk The Knot-a-Bead tabletop knotter tool is a fast and easy way to hand knot between beads. KNOT A BEAD FEATURES Beautiful and unusual clasps for bracelets and necklaces • Make professional looking hand knotted jewelry quickly and easily Affordable prices, excellent quality • Ergonomic design allows for natural www.claspit.co two-handed knot tying between beads beadmagazine.co.uk 35 • Spring-loaded stainless steel, auto-reset awl places knots with precision • Accommodates any shape beads up to 16 mm in diam • Use with all diameters and most types of bead stringing materials • Fast and easy-to-use, even for beginners ® To nd a Beadalon retailer near you, please visit www.beadalon.com/storelocator.aspJUNE/JULY 2014 • ISSUE 55
BEADWORK Designed by Rebecca Williamsspiked key necklaceShaft of the key This necklace is great to wear and is easy to personalise. Make one for friends and family to1. Thread 2 meters of thread onto a surprise them with a unique gift.size 12 needle. Attach a stop bead 2. Make your panel a tube by to add the second bead and out theleaving a 30cm tail. Pick up 48D. next Delica to add a Delica,Using 2 drop peyote make a at zipping up the ends. Knot securely continue round adding 2 andeven count panel. Weave 12 rows – at the top. Do not trim. missing one, step up at the end ofYou should have 6 pairs of 2 drop the round (you should have 6 sets of 2).beads at each end. BEADstore Bezelling the rivoli 5. Stitch a bead in the gap made • 6g x Delicas (D) 3. Pick up 36D - leaving a 30cm tail by beading the 2 beads, go down • 1g x size 15 seed beads (SB) the Delica’s and, using the same • 1 x 14mm rivoli – tie into a circle, ensuring the knot gap created in the previous round, • 28 x 4mm bicones is secure, go through a few beads go through 2 beads so you exit into • 16 x 3mm bicones to move away from the knot. Make 2 a gap, fill the gap. Continue round • Toggle clasp rounds of normal peyote; ensure filling the gaps with just 1 bead. You • 2 x 5mm jump rings you step up at the end of each should have 6 points. • 1 x 10mm jump ring round to start the next. • 4lb or 6lb Fireline 4. Making the ‘star’, peyote TOOLbox normally for 2 stitches, then ‘miss’ 1. • Size 12 and 13 beading needles Do this by going through the Delica • Scissors • Long nose pliers continued over JUNE/JULY 2014 • ISSUE 55 SUPPLYshop • All supplies from Fire Mountain Gems and Beads • See page 89 time&money Make in around 5 hours for under £10.36 beadmagazine.co.uk
We love this beadmagazine.co.uk 37beaded version of atrendy skeleton key.JUNE/JULY 2014 • ISSUE 55
6. After the last bead is added into Once the two parts are joined exit the end of the shaft so it exits the your thread onto the shaft. opposite direction of the end – gothe final gap, weave your thread to through 1 set of 2 beads and exit.the other side and weave a single Key end When looking down at your key yourow of peyote filling all the gaps. want your teeth to line up with theInsert your rivoli. 11. Using the tail thread pick up 1 bottom edge of the head (rivoli).7. Make your star points on this x 4mm bicone and 1SB. Miss the 15. ick up 2 , fill the gap, go SB, go back down through theside the same way as you did the bicone. Secure by going down 2 through 2 beads in line, pick up 2D.first side. Make sure that the dips end beads opposite to where the Go back through the 2D you addedand points are aligned and match thread originated. *Go up 2 end first. Using eyote stitch, zig zag awith the other side. Make sure beads next to the 2 you just exited, length till the first tooth is the lengthyou’re keeping your tension tight. up through the bicone and SB, miss you like. Once you tooth is the the SB, back down through the length your happy with, weave back8. Once your rivoli is in place, bicone and down through 2 end down – this strengthens and stiffens beads opposite to the thread path your tooth.weave your thread so that it exits an you just made. Repeat from * 1‘up’ bead along the centre of the more round. You should have 16. Weave down so you exit 2beads. threads exiting all the way round the 6 ‘end’ beads. Bring your needle beads on the shaft – this should9. Time to add the ‘spikes’. Leave back so that it exits the top of the leave a 2 bead gap between your end bead. teeth. ick up 2 beads and fill theone section free though as this will gap. Peyote 2 stitches.be used to connect to the shank. If 12. Pick up 11SB, wrap themyou have exited opposite a point in 17. The tricky tooth! Once thethe star, then start by picking up round the base of the bicone. Make1D, 1SB, 1D then go through the a tight loop by going through the second 2 drop peyote stitch isnext ‘up’ bead. If you have exited first few beads you picked up, go added weave your back so you areabove a indent in the star then pick down 2 end beads, up 2 end beads exiting 2 base beads. There shouldup 1 x 4mm bicone, 1SB. Miss the next to the 2 you just came down.SB and pass back down throughthe bicone, then go through the next 13. Go through 3 or 4 of the SBs‘up’ bead. You should have 6bicones all the way round just then down 2 end beads, repeatabove the indents and 5 sets of 2 once more. Weave thread into work,Delica points. You only do 2 sets of knot securely, weave in a bit moreDelica spikes in between the before trimming your thread.crystals. Key teeth10. Do not trim your threads. Using 14. Weave your long thread fromthe working thread from your spikedrivoli, attach this to the non-threadend of the key shaft. Do this by zigzagging between the rivoli andshaft. Go round twice to ensure thisis secure (the rivoli will still bewobbly at this stage, don’t worry wewill tighten it towards the end).38 beadmagazine.co.uk JUNE/JULY 2014 • ISSUE 55
be 2 beads between the first tooth 22. Continue along the top the 25. Using herringbone stitch, make the first 2 beads you added next tothe first tooth . ick up 2 beads. same as the bottom except start the strap long enough to loop overMake a tooth the same way you did with and finish with a bicone. You and then attach to the other side. Gothe first. They can be different should have 4 sets with a bicone through all the beads again to securelengths! Weave back down your and 3 sets without. Knot securely, and strengthen. Knot securely, weavetooth to strengthen. At this point if weave in a bit and trim thread. thread into work a bit and trim.you do not want to add ‘spikes’along the shaft then knot securelyand trim thread.18. Work your way along from the 23. The head of your key will still Necklaceteeth along the shaft, but keep in be wobbly so to secure it further, 26. Thread onto your needle 1.75mline of the teeth, so your needle take your thread from the rivoliexits the first set of 2 beads. ick which should be exiting onto the of lb fireline. eaving a 20cm tailup 1 , 1SB, 1 , fill the gap, go shaft. Weave your thread so it exits attach a stop bead. Pick up 6D,through the next 2 beads. a set of beads on the edge of the 1SB, *3D, 1SB*. Repeat from * to * 5 shaft, pick up 1D, take your needle times. You should have picked up a19. Pick up 1SB, 1 x 4mm bicone, through the centre bead on the rivoli SB last. (bead sitting under the top point),1SB. Miss the last SB, go back pick up another D and weave back 27. Pick up 1 x 3mm bicone, 1SB,through the bicone, pick up 1SB, down into the shaft. Pull tight.then through 2 shaft beads.* Weave your way to the back and 3D, 1SB, 3D, 1SB, 3D, 1SB, 1 x repeat. 4mm, 1SB, 3D, 1SB, 3D, 1SB, 3D,20. Continue along the shaft from 1SB. Repeat till all bicones are strung, ending with a 3mm.to * till you have added 4 sets of D,SB, D and 3 sets of SB, bicone, SB. 28. Pick up from step 26 * to * endYou should end the bottom row withD, SB, D. picking up 6D. Missing the last 6D take your needle through the first21. Weave your way up to the top 24. If your thread is still pretty long SB. Pick up 3D, go through the SB.of the shaft so you can add ‘spikes’ weave your way back onto the back 29. Repeat all the way down thealong the top. Exit a set of ‘up’ of head until you reach the side ofbeads – should be 2nd set from the the centre section. We are going to string adding only D beads andtop and opposite the last set of add a loop here using herringbone going through either a SB orspikes added on the bottom. stitch. Starting on one side, pick up combination of SB, bicone, SB. 4D, secure onto a D. \"stroke of genius\" 30. Once you get to the end and• I love old keys and wanted something have gone through the last SB, take your needle through the last 6Dalong those lines but made out of beads from the top and back through theand then it struck me whilst making SB, pull tight to form a loop. Weavesomething else out of tubes and I had a both ends of thread (working threadrivoli I had bezelled earlier but didn’t and tail) into necklace making atuse, I put the 2 pieces together and saw least 3 secure knots along the way.my key. Spikes were added later to give Once secure trim the threads.it a bit of ‘edge’. 31. Add a 5mm jump ring to each loop and half of the toggle set to each jump ring. To attach the key, use a 10mm jump ring by attaching the jump ring to the loop on the key and then attaching the jump ring onto the necklace.JUNE/JULY 2014 • ISSUE 55 beadmagazine.co.uk 39
Beads, Jewellery and so much more We now have a large and ever expanding range of ToHo Seed Beads available Workshops, both instore and online children's parties and jewellery 3 Long Street Wotton under Edge GL12 7ES making classes Tel: 01453 520 000 available in store. www.tanzeedesigns.co.uk Fabulous range of beads, semi- precious gem stones, findings, 300+ types of seed beads and jewellery making tools all available in store and atwww.raggletagglebeads.co.uk Shop Opening Times: Tuesday - Saturday 10.00 am - 4.00 pm Use code MBEADMAG14 for 10% discount on website* Unit 6 The Old Garage, Hingham Road, Hackford, Norfolk NR18 9HF Tel: 01953 851734 Email: [email protected] * valid till 31/12/14 £1.95 UK Post or FREE on orders over £15 Get the girls together! Jewellery making Classes from £25 Beads and Buttons from 5p Tools from £4 Inspiration and beading advice FREE! Beads • Tools • Findings • Gemstones • Buttons • Classes • Wire • Felt www.thebeadboutique.co.uk or Tel: 01787 464909 Email: [email protected] beadmagazine.co.uk JUNE/JULY 2014 • ISSUE 55
We at the bead pot love beads and creating and sharing all this with our customers, supplying all your beading needs with products from around the world. [email protected] www.beadpot.co.ukBead Mag - June-July 104-13-24_2L7ayo7u8t 148304/044/2014 11:29 Page 1Let’s Make Jewellery NEWVisit our WEBSITEOur easy to use website has a massive selection of over6,000 products all at competitive prices.Our stock of beads and cabochons include Shamballa beads, Pandora style,Swarovski crystal, semi-precious, glass, metalised and natural beads! We also havea fantastic selection of glass candy beads to choose from. Our range of findings needs to be seen to be believed! Choose from plated metal, Sterling silver, Thai silver and 9ct gold.PJBEADS PJ beads is a limited company W: www.beads.co.uk E: [email protected] T: 01704 575461 beadmagazine.co.uk 41JUNE/JULY 2014 • ISSUE 55
BEADWORK Designed by Donna McKean-SmithkFuLmATihimo variation In this kumihimo variation, use your round disc to create a unique double-sided at beaded braid.BEADstore 1. Cut 2 pieces of cord approx. 1m each, 4. On the next repetition, bring 32 to 15• 2m x 0.6mm tie in the centre (as you do with the 8 braid) with no bead on. Pick up a bead and take and position the knot in the centre of the 16 to 32, popping the bead to the centre of macramé cord disk. Position the cords to the right of 32, 8, the braid as you go. the bead needs to sit 16 & 24. under the cord placed at 15 & 8. It is not• 5g x size 5 beads like the beaded 8 braid kumhimo, it does• 4mm x Kumihimo not quite tuck under the cord, it is secured by then moving the next cord over. end cap 2. Braid 2 repetitions round without adding 5. Take 8 to 25 with no bead on. Pick up aTOOLbox any beads. Take the cord from 32 to 15, bead and take 24 to 8, popping the bead to• Small Kumihimo followed by the cord in 16 to 32 then take the centre of the braid as you move it over, the cord in 8 to 25 , followed by 24 to 8. again it will only be secured in place once disk Reposition the cord in 15 to 16 and the cord you continue braiding, you need to ensure in 25 to 24. that each bead you move over goes in the• E6000 glue correct place and gets secured by the next• Kumihimo weight 3. With this braid you can follow the braid you move over. (optional) numbers as the pattern now repeats; as with any braid, once you have learnt theSUPPLYshop repetition it becomes easier to make without referring to the numbers. You will find the• All supplies from centre tries to pull to the side you are placing the cord; you can use 2 fingers Riverside Beads under the disk to hold the braid in the centre whilst you move the cords (you may• See page 89 find the smaller kumihimo disk makes this more comfortable).time&moneyMake in aroundtwo hours andfor around £5.42 beadmagazine.co.uk continued over JUNE/JULY 2014 • ISSUE 55
6. Reposition the cord in 15 to 16 and the 7. When you have the correct length, braid 2 DESIGNnotecord in 25 to 24, repeat Step 4 until you repetitions without any beads on ready to • Once you havehave the desired length for your finished fasten the end cap. Tie 2 cords off with thebraid, this picture shows the completed other 2 cords to finish or use the whipping braided a fewbraid underneath. technique. Add a drop of Hypo cement to repetitions and will seal and using E6000 add an bell closure have something end cap to finish. more substantial to hold, use 2 fingers underneath grip the braid as it comes through. It is also important to have the braid facing the same way, I have the side with the cord showing facing N at all times.JUNE/JULY 2014 • ISSUE 55 beadmagazine.co.uk 43
WIREWORK Designed by Dawn Gatehouse PEACOCKbutterfly headbandBEADstore Be inspired by the vibrant colours of the eacock Butter y to create a showstopping headband using• 3 x mm fire wirework techniques combined with bright crystals. polished beads 1. Measure approx. 30cm of 0. mm vintage 4. Cut each end of wire 2cm from the brown bronze wire and straighten with nylon at butter y’s head and using round nose pliers• 1 x 8mm round nosed pliers. oughly fold the wire at 10cm make a small spiral at each end to make the in so that you have one side double the antennae. bead brown length of the other.• 10g x size Miyuki 2. Thread 1 x mm brown fire polished Triangles Iris ed bead on the 10cm length and use the 20cm length to create a double wrap above the• 10g x size round bead. epeat with another brown fire polished bead. seed beads copper 5. Cut 1 metre of 0.8mm vintage bronze• x mm fire wire and straighten using nylon coated at nosed pliers. Then, taking the wire at the polished beads halfway point, wrap around the body of the Siam ed butter y twice as close to the head as possible.• 2 x mm fire 3. Add a third fire polished brown bead 6. Using your hands to shape the wire polished beads Amber and this time make wraps, then thread a 1 make a rough wing shape and double wrap x mm round and make 2 wraps. the wire around the body.• 2 x mm Chinese crystals ark Topaz• 2 x mm fire polished beads ark Topaz• 4 x 8mm druk rounds Aqua• 2 x 10mm fire folished beads Siam ed• 0.8mm Vintage Bronze wire• 0.3mm Vintage Bronze wire• Single tiara band time&money continued over JUNE/JULY 2014 • ISSUE 55 Make in around 3 hours and for less than 30.44 beadmagazine.co.uk
JUNE/JULY 2014 • ISSUE 55 beadmagazine.co.uk 45
fun 7. Using the other straight length of wire on 10. Take a length of 0.3mm vintage bronze tter the other side, make the other large wing wire and wrap around the top of the larger the same size as the first. on’t worry too wing 3- times pulling it as close to thefacts much about tidiness at the point as this can body as possible. be sorted out with pliers once you have the• Butter ies can correct shape. 11. Thread on a copper seed bead andlive anywherefrom a week to a wrap 3- times at the base of the wing.year, depending Complete another row using 2 copperon the species. beads, though you may need to use more• Scientists than 2 if you have any gaps.estimate thereare between 8. Shape the lower wings in the same way, 12. Using red Miyuki triangle beads and1 ,000 and20,000 different wrapping the wire in the space before the bead one row of just triangles, then make aspecies of last bead of the body. Trim the ends and row of triangles ending with 1 x mm firebutter y. press them in using chain nose pliers. polished Siam ed ensuring this bead sits• Butter ies have at the top of the wing.taste receptorson their feet 9. Using at nosed pliers tidy up the shapewhich helps itfind tasty plants until they wings are as symmetrical asquickly. possible. Using a hammer and block gently tap the wire on the parts of the wings that• Butter ies can't do not cross to work harden them. y if they're cold.• Though itseems likebutter ies onlydrink nectar from owers, theyneed tosupplement thesugars withminerals andnutrients. Themost commonplace they canget them: mudpuddles!46 beadmagazine.co.uk
13. Complete another row using triangles, 16. epeat Steps 10-1 for the other wing.then another, ending with 1 x mm Siam You may need to add more or less beads ed. You may need to wrap - times after as it is unlikely that your wings sizes will be identical. Trim any excess wire using ushthis row to ensure your wire is far enough cutters. Bead the lower wings in the sameover the frame for the next row. way with seed beads, but use the 10mm red and mm blue bead on the last row. DESIGNnotes14. Next thread a row of copper beads • Try making thefollowed by a row of copper ending with 1 x mm fire polished brown. Then thread two butter y with mm beads on the bodyrows of mm crystals ark Topaz ending and with smallerwith 1 x mm round ark Topaz at end of wings and attach to athe second row. brooch pin or with 17. Using 0.3mm vintage bronze wire mm beads and 0. wire to make a attach the butter y to a tiara band by pendant. wrapping the wire approx. ten times around the band and then wire the butter y on by • The possibilities of wrapping wire around the head and body, wrap approx. ten times the other side of the colour combinations butter y and trim the ends and press them are endless. Why not to the band to finish. make your favourite15. Finish the last row with 1 x mm round TOOLboxAqua, 2 x mm fire polished Siam ed and • ound nose pliers1 x mm crystal ark Topaz. • Chain nose pliers • Flat nose pliers 18. ull the wings up slightly so that the • Flush cutters • Nylon coated at butter y looks like it has landed and you’re all finished with your headband. nose pliers • Tape measure • Steel Block • Hammer SUPPLYshop • Wire from almer Metals • Beads from C Beaders and The Bead Trail • Crystals from Southampton Bead Shop • Tiara band from Spellbound Bead Co. • See pageJUNE/JULY 2014 • ISSUE 55 beadmagazine.co.uk 47
BEADPROFILE Aniko Kolesnikovaobsession with clayAniko Kolesnikova is an award-winning polymer clay artistwho inspires others with her unique journal and jewellerycreations. Get an inside look into her designer world.Most designers have one speci c Artistic categories Dark Fantasy pieces, and you get lost style they’re known for, whether First is her ‘Dark Fantasy’ theme. “ ese her gothic-style world. it’s using bright colours, trying pieces are mostly black with silver dry-bold new designs, or reworking a brushed nishes.” Full of mystery and e Hive is a perfect example of thistraditional technique. Polymer clay artist wonder, these pieces often include rst theme. ough mostlyAniko Kolesnikova has a speci c style, colourful glass beads, gothic elements, monochromatic, Aniko’s sparse use ofbut she raises the bar by using this style metallic studs and beads, bugs and ies, green creates an uneasy feeling amongin three very di erent ways. feathers and wings. One look at her the details included in the piece. Every inch of the cover has a texture of some kind, showcasing her ability to transform clay into a work of art. e second theme her pieces follow is ‘Brown and Earthy’. “ ese journals and jewellery are mostly made of brown polymer clay, which makes them look like real brown leather,” shares Aniko. Dragons, di erent animals, and mysterious creatures are often made in this theme. ey tend to look more vintage than the Dark Fantasy pieces, Aniko notes. Wait for Me by the Lighthouse was created in the Brown and Earthy style, and though it is drastically di erent from the Dark Fantasy pieces, Aniko still manages to capture your attention with all of her ornate texturing and detail. In the background, she has added a large ship, which, with an expert use of colour, appears to be retreating in the mist. continued over48 beadmagazine.co.uk The Hive. JUNE/JULY 2014 • ISSUE 55
Clockwise from top left: Raven,Japanese Dragon Totoku, Wait forMe by the Lighthouse. 49
Wind Summoner's Necklace placed second in the 2013 British Bead Awards.Using colours adds garment and absolutely stunning. When asked whatto the complexity of accessory looks perfect before the she is most known for, Aniko repliesthe piece, giving it photo is uploaded to the company’s that it’s her journal covers and herdepth. website. unique ‘texture explosion’ style. She ‘Flora and Fauna’ ough she worksis the third theme all day, she does notAniko uses in her consider her polymerwork. ese pieces are clay designs a hobby.full of colour, owers, She spends all of herblossoms, and many free time developingdi erent creatures. her business, and isBright colours attract looking forward to theattention immediately, day when she can quitand leave your eyes searching for every her day job and let herspectacular detail. designs be her full- time work.Daily lifeHer talent is undeniable. Aniko has a As previouslyBachelor’s degree in Arts, which she noted, her pieces arereceived in her hometown of Riga,Latvia. She lived in Riga, the capital ofLatvia, for 24 years before moving toLondon, where she currently resideswith her ancé and her little dog. Working full time as a retoucher fora photography studio, Aniko spends herdays perfecting photos. She works withcompanies such as New Look and JohnLewis, and she has to make sure each50 beadmagazine.co.uk JUNE/JULY 2014 • ISSUE 55
Search